CRON-based trigger is little different from other schedulers such as Task Schedulers and SQL Agent . The following example was taken from www.help.talend.com.
To add a CRON trigger to a rule:
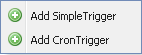
1. On the Scheduling page, click Add trigger on the toolbar located above the execution scheduling table.
2. Select Add CronTrigger from the drop-down list.
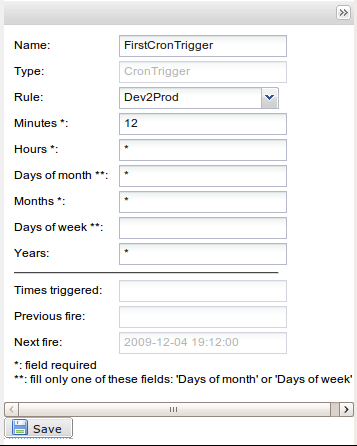
The configuration panel opens to the right:
3. Fill out the configuration panel with the following information:
Field
|
Description
|
Name
|
Name of the trigger.
|
Type
|
Type of trigger. CronTrigger displays and is read-only as you selected Add CronTrigger from the Add trigger drop-down list.
|
Rule
|
Select the rule for which execution is to be triggered..
|
Minutes
|
Minute you want to execute the migration rule.
|
Hours
|
Hour at which you want to execute the migration rule.
|
Days of month
|
Day of the month when you want to execute the migration rule.
|
Months
|
Month when you want to execute the migration rule.
|
Days of week
|
Day of the week when you want to execute the migration rule.
|
Years
|
Year you want to execute the migration rule.
|
Icon
Note
|
Fields marked with **: Select one or more week day OR one or more dates.
Fields marked with *: mandatory information
For multiple selections, press Ctrl + click
|
4. The following fields are read-only triggering information which display automatically, as soon as the trigger is saved (hence fired).
Time triggered
|
Number of times the trigger has already fired.
|
Previous fire
|
Date and time at which the previous triggering took place.
|
Next fire
|
Date and time at which the next triggering will take place.
|
5. Click Save to validate the CRON-based trigger configuration.
The following text were taken from the above link.
CronTrigger
CronTriggers are often more useful than SimpleTrigger, if you need a job-firing schedule that recurs based on calendar-like notions, rather than on the exactly specified intervals of SimpleTrigger.
With CronTrigger, you can specify firing-schedules such as "every Friday at noon", or "every weekday and 9:30 am", or even "every 5 minutes between 9:00 am and 10:00 am on every Monday, Wednesday and Friday".
Even so, like SimpleTrigger, CronTrigger has a startTime which specifies when the schedule is in force, and an (optional) endTime that specifies when the schedule should be discontinued.
Cron Expressions
Cron-Expressions are used to configure instances of CronTrigger. Cron-Expressions are strings that are actually made up of seven sub-expressions, that describe individual details of the schedule. These sub-expression are separated with white-space, and represent:
1. Seconds
2. Minutes
3. Hours
4. Day-of-Month
5. Month
6. Day-of-Week
7. Year (optional field)
An example of a complete cron-expression is the string "0 0 12 ? * WED" - which means "every Wednesday at 12:00 pm".
Individual sub-expressions can contain ranges and/or lists. For example, the day of week field in the previous (which reads "WED") example could be replaces with "MON-FRI", "MON, WED, FRI", or even "MON-WED,SAT".
Wild-cards (the '' character) can be used to say "every" possible value of this field. Therefore the '' character in the "Month" field of the previous example simply means "every month". A '*' in the Day-Of-Week field would obviously mean "every day of the week".
All of the fields have a set of valid values that can be specified. These values should be fairly obvious - such as the numbers 0 to 59 for seconds and minutes, and the values 0 to 23 for hours. Day-of-Month can be any value 0-31, but you need to be careful about how many days are in a given month! Months can be specified as values between 0 and 11, or by using the strings JAN, FEB, MAR, APR, MAY, JUN, JUL, AUG, SEP, OCT, NOV and DEC. Days-of-Week can be specified as vaules between 1 and 7 (1 = Sunday) or by using the strings SUN, MON, TUE, WED, THU, FRI and SAT.
The '/' character can be used to specify increments to values. For example, if you put '0/15' in the Minutes field, it means 'every 15 minutes, starting at minute zero'. If you used '3/20' in the Minutes field, it would mean 'every 20 minutes during the hour, starting at minute three' - or in other words it is the same as specifying '3,23,43' in the Minutes field.
The '?' character is allowed for the day-of-month and day-of-week fields. It is used to specify "no specific value". This is useful when you need to specify something in one of the two fields, but not the other. See the examples below (and CronTrigger API documentation) for clarification.
The 'L' character is allowed for the day-of-month and day-of-week fields. This character is short-hand for "last", but it has different meaning in each of the two fields. For example, the value "L" in the day-of-month field means "the last day of the month" - day 31 for January, day 28 for February on non-leap years. If used in the day-of-week field by itself, it simply means "7" or "SAT". But if used in the day-of-week field after another value, it means "the last xxx day of the month" - for example "6L" or "FRIL" both mean "the last friday of the month". When using the 'L' option, it is important not to specify lists, or ranges of values, as you'll get confusing results.
The 'W' is used to specify the weekday (Monday-Friday) nearest the given day. As an example, if you were to specify "15W" as the value for the day-of-month field, the meaning is: "the nearest weekday to the 15th of the month".
The '#' is used to specify "the nth" XXX weekday of the month. For example, the value of "6#3" or "FRI#3" in the day-of-week field means "the third Friday of the month".
Example Cron Expressions
Here are a few more examples of expressions and their meanings - you can find even more in the API documentation for CronTrigger
CronTrigger Example 1 - an expression to create a trigger that simply fires every 5 minutes
"0 0/5 * * * ?"
CronTrigger Example 2 - an expression to create a trigger that fires every 5 minutes, at 10 seconds after the minute (i.e. 10:00:10 am, 10:05:10 am, etc.).
"10 0/5 * * * ?"
CronTrigger Example 3 - an expression to create a trigger that fires at 10:30, 11:30, 12:30, and 13:30, on every Wednesday and Friday.
"0 30 10-13 ? * WED,FRI"
CronTrigger Example 4 - an expression to create a trigger that fires every half hour between the hours of 8 am and 10 am on the 5th and 20th of every month. Note that the trigger will NOT fire at 10:00 am, just at 8:00, 8:30, 9:00 and 9:30
"0 0/30 8-9 5,20 * ?"
Note that some scheduling requirements are too complicated to express with a single trigger - such as "every 5 minutes between 9:00 am and 10:00 am, and every 20 minutes between 1:00 pm and 10:00 pm". The solution in this scenario is to simply create two triggers, and register both of them to run the same job.
Cheers!
Uma